Showing posts with label Cricut Artistry. Show all posts

Tuesday, August 7, 2018

Here's to You - the other four cards

In yesterday's blog hop I mentioned I would post the other four cards. The three cards yesterday were unique because I cut out windows through each layer of paper and heat embossed the sentiment on the bottom layer. The four cards today are mostly like the workshop directions, with a little embossing and more silver glitter cardstock embellishments from the same Cricut cartridge, Artistry.

Cards #1 and #2:
My sewing machine was handy so I sewed the vellum heart onto the glacier one. I silver embossed the sentiment and added an additional glitter cardstock Cricut cut that went with the workshop.


(Card #3 was in yesterday's post.) Card #4, I switched the sentiment to one I need more often, silver embossed it. added the Cricut cut vine that I enlarged before cutting, and added the butterfly that was the base of the Sorbet butterfly that I didn't include on yesterday's card:
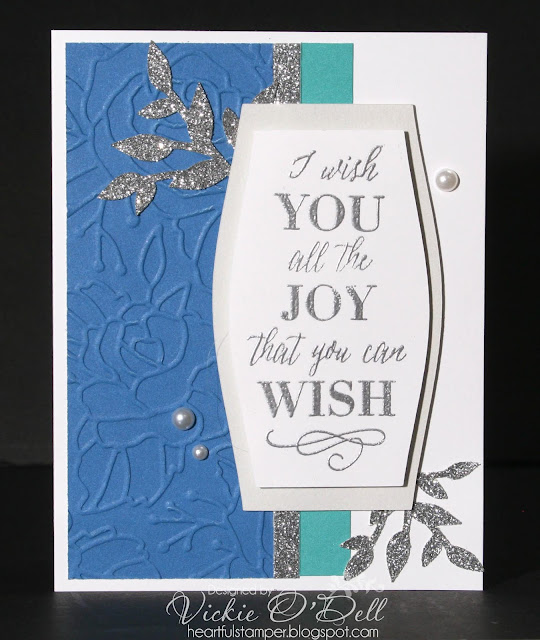
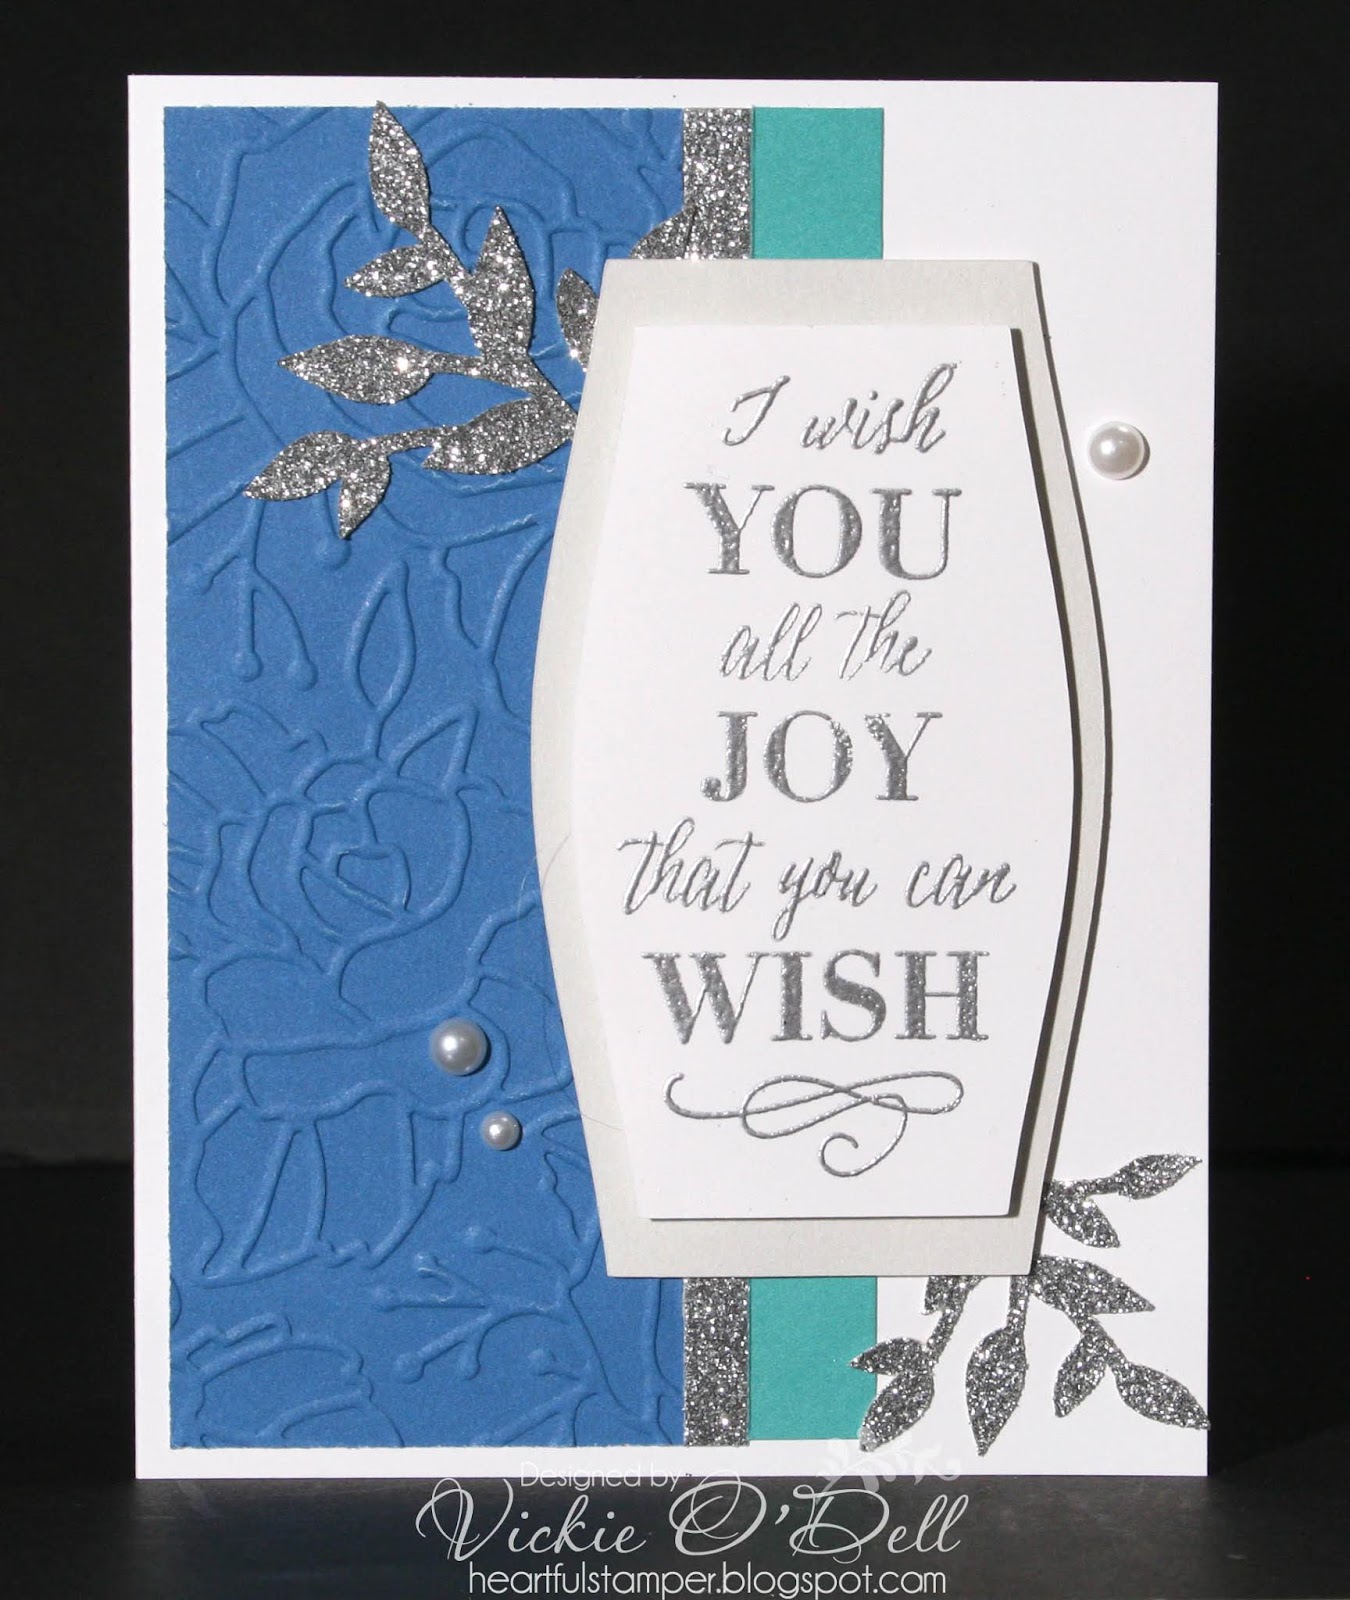

Card #5 :
I added a Pacifica mat for the sentiment shape and replaced the thin strip of glitter cardstock with the leafy branch that was originally meant to go with card #3 that I displayed yesterday.


Once again, here is my cut file for the Here's to You workshop kit with the extra changes I made on all seven cards:

https://design.cricut.com/#/design/103329890

This workshop kit is only available in the month of August. You can purchase it through your CTMH consultant or here on my website.  All of the original workshop directions are on the link on that page.

Thanks for visiting!

Ephesians 3:12 (WEB)
in whom we have boldness and access 
in confidence through our faith in him


365 Promises of God - Promise #219: Through faith in Christ, you can boldly approach Me with confidence.


Monday, August 6, 2018

CTMH Here's to You Blog Hop


Welcome to our blog hop featuring the August Here's To You  kit with four stamp sets and coordinating papers, cards, and pearls. Each participant is sharing additional ways to use this kit.  If you've just come from Gina Brandstetter, you're on the right path. To see the entire list of participants, visit Melinda Everitt's page here.

I really like the four stamp sets that have large sentiments. The kit includes the cut file link for those who use Cricut Design Space. It uses the Artistry cartridge. I made the seven cards, but chose to remake three of them instead of making the layout. I used additional Cricut cuts using the cardstock that was included. I cut out windows through more than one layer that I pop dotted, with the sentiment silver or gold embossed on the bottom layer. I also cut a few flowers and butterflies from the Artistry cartridge.

Here's my replacement for Card #3. I added an extra white frame plus flowers:


For Card #6 I used three scraps of Sweet Leaf, Canary, and Sorbet cardstock to cut embellishments:


Card #7 has embossed vellum and a lot of bling.


Tomorrow I'll post what I did with the other four cards by making minor changes with the embellishments cut from the silver glitter paper.  Here is my Design Space cut file with pieces for my cards plus the others from the CTMH workshop:  https://design.cricut.com/#/design/103329890

This kit is only available in the month of August. You can purchase the stamp sets individually or the entire workshop kit (with or without the embossing folder) from your CTMH consultant or here on my website.

Thank you for visiting! Now you're ready to see what Haley Dyer has to inspire you!

Sunday, May 6, 2018

Butterfly Wreath

It's no secret to family and friends. I love crafting, especially scrapbooking and cardmaking. Yesterday was National Scrapbook Day and I gave myself to craft almost all day. But I began the day with something else I love to do - writing personal notes or letters of encouragement in cards that I send. I sent three yesterday which is as fulfilling for me as making them. It may be a lost art to communicate with pen and ink instead of social media, but I still think it's important. I have a lot of handwritten letters from a long lost grandmother that are still dear to me. Who can ever find a facebook post from years ago with the same kind of personal touch?

Here's the card I made inspired by four challenges:

I used this week's Atlantic Hearts Sketch and Color Throwdown


I used the two Cricut cartridges for images, Flower Market for the wreath and Artistry for the butterflies. Feel free to check out my cut file.  I added neutrals, cream flowers and black. I stamped the kraft butterflies with a very old CTMH stamp set, Romantic Backgrounds. I stacked two of the butterflies attached with glue dots. I started to cut cream flowers but noticed some from my stash had tiny wooden beads that matched the kraft cardstock.

I love to dry emboss white backgrounds. This one uses a retired CTMH vine folder. The die cut sentiment is part of CTMH Thankful for You sitting on CTMH Coral Shimmer Trim.

Thanks for visiting! May God bless your crafting and your giving.

I'm sharing this card with the following challenges:

Atlantic Hearts Sketch Challenge #262 - sketch
Color Throwdown #491 - coral, green, kraft, white
Crafty Calendar May Challenge - Things with Wings
Fab 'n' Funky Challenge #392 - wet or dry embossing

365 Promises - Promise #126: My face will shine upon you all the days of your life.


Tuesday, February 20, 2018

February Blog Hop - Think Pink


This month Close To My Heart is having a special sale on favorite PINK papers, inks, and embellishments, as well as some gold embellishments, so our blog hop is all about giving you ideas for using those pink elements.
You 're on the right track if you have just come from Alyson Mayo's blog. To see the entire list of participants, visit Melinda Everitt's blog here.  (We're having an ice storm as I type, so I'm hoping I can finish this post without the power going out.)

I used Cricut Design Space, basic shapes, and the Artistry cartridge to weld a heart background to a rectangle border for two versions of  my 6.5" x 5" card. The shape will also fit a 5.5" x 4.25" card.


Here is my cut file in case you have the Artistry cartridge and would like to use the welded image I made. I cut two of these using the light side of the Blossom cardstock and one from the darker side.  I backed the cut panel with watercolored flowers from the Adventures Fundamentals paper pack. I placed some Bashful and Gold Glitter papers behind a few of the hearts,p then used pop dots to create dimension. I embellished  a couple of hearts with pink Bashful Pearls (out of stock now) and added gold ribbon from the Basics Ribbon pack.

This second card was easier to make with the lighter side of the Blossom cardstock mounted on Bashful cardstock backed with a Raspberry mat. Then I filled the hearts with pieces from the cut I made from the darker side of Blossom cardstock. Then I used Thin 3-D Foam dots to slightly pop up a second cut of the lighter side, lining it up easily with the layer that was glued flat on the mat. I embellished it with White and Gold Ribbon, Gold Glitter Gems, and a Gold Heart Clip that fit perfectly on one of the heart cut-outs. The word "love" was cut from Gold Glitter Paper using the "love" Thin Cut that will be available again March 1st!

Now you're ready to move on to see what Darlys Recker has created for you!


Die Cut Hearts

Here's  a die cut card that doesn't have to be only for Valentine's Day. Sharing love should be our daily gift to those around us.

This was easy to design on Cricut Design Space. I selected two squares, unlocked the sizes to make rectangles, sized them and attached so it would cut a frame, then added the heart panel and sized it to slightly overlap the smallest rectangle. The hearts were welded to the frame.  If you have Cricut Artistry, you're welcome to use my cut file! This card is a preview of two similar, more embellished cards I'll be sharing in tonight's blog hop after 8:00 p.m. Central time. (The word "love" is from a Thin Cut die that will be available again March 1st.) I wanted a watercolor look for the background, but I had a very old paisley watercolor ctmh paper in my scrap drawer from over 10 years ago that looked great!


Thanks for visiting! May God bless you as you share love with your own cardmaking and giving!

I'm sharing this card with the following challenges:

Crafty Cardmakers #205 - Love and Romance
Crafty Friends Challenge #77 - Love is in the Air
Cut It Up #141 - Layers of Love
My Time to Craft # 364 - Love is all you need


Thursday, April 20, 2017

Sweet Birthday Wishes

Someone asked me last week to make a bunch of children's birthday cards because she has so many grandchildren!  For this post I'll share the outside of two "girl" cards that were inspired by the challenge at Bitten By the Bug2 this week, "Sweet." Images and word for the first card were cut using Cricut Artistry. The cone and sprinkles were stamped using CTMH Sugar Rush Scrapbooking stamp set. I printed the rest of the sentiment using Word.


This second card's cupcake is from Cricut Doodlecharms. I embossed the white background with Cuttlebug's "Happy Birthday" folder. The "chocolate icing" was also embossed and I lightly rubbed a small chocolate pigment ink pad over the raised portion. I added some Sugar Rush glitter gems. I used a bone folder to emboss lines every 1/4" on the cupcake base.


I'm sharing the first card with the following challenges:

Bitten By the Bug 2 - the word SWEET
Make My Monday Challenge #44 - Embossing, heat or dry
Ooh La La Creations #226 - Birthday
Pile It On #129 - interactive and/or Birthday
Send a Smile 4 Kids - punches and/or die cuts

Tuesday, March 28, 2017

Random Stamped Botanicals

My first experiences stamping in 2003 were making scrapbook pages with random stamping. They were really pitiful! I felt challenged to try my hand at the Heart 2 Heart random stamped background challenge to see if I could do any better. I decided to make a card for my most artistic friend to let her know I'm still praying for her after the loss of her mom.

I wanted to combine this challenge with the botanicals challenge at Try It On Tuesday. Before I started stamping my images I decided to random "stamp" some color with my small pigment inks. I wanted them to match the colors in the retired Paper Garden papers, so I used retired Buttercup and Blush along with Sweet Leaf and Thistle. First I just pressed and released each color but I wanted the color to be darker and not always square, so I pressed harder and twisted a little. I moved the stamping of each color across the page as if I was following a chevron, diagonally up and down. I didn't mind if there was a little overlap. I did need to use my heat tool between colors since pigment inks take longer to dry.  I should have taken a photo of those two steps, but maybe you can see the result below. I chose to stamp black outline flowers, leaves, and a butterfly, keeping each one on its own color. If you're new to random stamping, you sort of turn the stamp different directions as you go across the page.


 If I did it again, I think I'd consider whether the black line images had thick or thin lines and I'd keep them the same. The biggest flower stood out more than I wanted. So I covered this panel slightly with doily halves and used a large black butterfly cut using Cricut Artistry cartridge.


I used leftover pieces cut from the top and bottom of each piece to decorate the inside:


I'm glad I tried random stamping again, but enjoyed even more stamping with the small pigment inks first. I'll definitely try that again!

Thank you for visiting! May God bless your crafting and the recipients of your creations!

I'm sharing this card with the following challenges:

Heart 2 Heart Challenge - Background Random Stamping
Simon Says Stamp Monday Challenge - Things with Wings
Try It On Tuesday - Botanical

6.5" x 5" Card Recipe:
Paper - CTMH White Daisy Cardstock, Black cardstock,  retired Paper Garden patterned papers
Inks - CTMH Pigment Inks - Buttercup, Blush, Sweet Leaf, Thistle; Memento Tuxedo Black
Stamps - CTMH: Happy to Be Friends (leaf), Lovely Birthday (large flower), retired Adore You SOTM (small flower), retired Your Beautiful Self (butterfly); Hero Arts Stamp and Cut-Prayers
Embellishments - CTMH gold glitter gems, 6" Wilton doily, gold and satin edged organdy ribbon
Tool - Cricut Artistry


Wednesday, March 1, 2017

March Tea-rrific Stamp of the Month Blog Hop


Welcome to our March Stamp of the Month Blog Hop using Close To My Heart's Tea-rriffic stamp set. If you have come from Tamytha Jenkins' blog you're on the right path. To see the entire list of bloggers in the hop visit Melinda Everitt's blog.

I made four samples to show my scrapbook/card club this month, all using the Dreamin' Big paper pack and some coordinating cardstock. The first two sets of cups are backed with a mat made from one of the PML cards and two zip strips. The cup details were colored with ShinHan Touch Twin alcohol ink markers.


The next two use the flowered paper and the glacier and juniper cardstock for the cups embossed with Silver ep. The mat behind the first cup was cut using the Artistry Cricut cartridge.


The mat behind the cup on the next card was cut using Artbooking Cricut cartridge.

If you don't already have a consultant, you can purchase this stamp set for $5.00 with a $50.00 order here on my website OR you can purchase it at full price, $17.95.
Thank you for visiting! Now you are ready to move on to Tracey Pierce's blog to see artwork!


Sunday, February 5, 2017

Easter Bunny SOTM Card

When I saw this week's Color My Heart Color Dare, I instantly pictured an Easter card, so I enjoyed playing with the  stamp of the month again. If you missed the earlier blog hop featuring this stamp set, you can find it here

The color dare featured silver, Black, White Daisy, Pansy, and Raspberry:

No automatic alt text available.


Most of the supplies used are from CTMH except the white ribbon. In addition, I used Cricut Art Philosophy and Artistry cartridges along with Cricut Design Space for the free scalloped background mat from Cricut Craftroom.  If you have those two cartridges you may use my cut files with Design Space. They are sized for a 5.5" x 4.25" card.

I paper pieced the bunny's ears and dress using Raspberry heart paper from Adventure Fundamentals collection. I used the Confetti embossing folder to add some texture.  (The silver flowers decorating the egg on the left are no longer available.)

Thank you for visiting!

I'm sharing this card with the following challenges:
All Sorts Week #401 - Paper Piecing
Color My Heart Color Dare #229 - silver, Black, White Daisy, Pansy, Raspberry

Morgan's Art World #2 - Add Ribbon
PDE Linky Party #158 - anything goes
Stamping Sensations February Challenge - animals
The Ribbon Girls - anything goes with ribbon

Saturday, July 2, 2016

Mojo Monday 454 Pineapple Card for a Sweet Friend

I needed a card for a friend I've known for 50 years. It's amazing to talk with someone you only see once every few years and it still seems like just yesterday. She and I were both teachers and share some of the same rare physical ailments. I wanted to send her a note to let her know I'm thinking of her and praying for her health.


This week's sketch at Mojo Monday and the fun summer Calypso papers inspired this card.


The pineapple was cut using Cricut Artistry. The yellow circle was made using a Spellbinder's Teardrop Circles die, which reminded me of a slice of pineapple. The sentiment came from a stamp set called So Many Smiles.


Thanks for looking! May God bless you with special friendships that last a lifetime.


I'm sharing this project with the following challenges;
Crafty Calendar July Challenge - punches and/or dies
Crafty Girls Creations - anything goes
Mojo Monday #454 - sketch
Simply Papercraft #32 - anything goes
Southern Girls #137 - anything goes


Friday, July 1, 2016

July Stamp of the Month Blog Hop - From the Notebook


Welcome to the July Stamp of the Month Blog Hop featured by 18 Close To My Heart consultants.  If you just came from Jennifer Dykstra's blog, you're in the right place.  If you lose a link along the way, you can find the entire list at this blog by Melinda Everitt.

As shown on the image above this collection of the stamps is perfect for the front of a mini-album. They would be great on scrapbook pages, too. I chose to play with the images to make three cards. This first one has an "office" feel to it. I used Kraft cardstock for the base and the striped paper from the Magical paper pack. I used 10 of the images from the stamp set and Cricut cuts using Artistry.


I decided to simply play with the chevron/arrow stamp to make a card celebrating an achievement. I used a vertical stripe embossing folder by turning my white paper at an angle in the folder. The inks are cranberry, sapphire, and honey.  The fun sapphire sequins are part of a set that matches the Magical papers. The Red Shimmer Trim  and silver glitter paper were added for some bling!


My third card was simply my way of using the stamps to make a more simple, feminine card that doesn't look like what you'd expect.  It's simply embellished with black shimmer trim and one black and white striped sequin to help with the contrast.  I embossed the kraft cardstock with a 5" x 7" floral embossing folder.  


Thanks for visiting! Now you're ready to move on to Kristen Jade's wonderful artwork!

Sunday, March 13, 2016

Mojo Monday 438 Brighter Days Card

Yesterday I did a workshop with a friend who had surgery a few weeks ago. Although she's off work and doing physical surgery, she's so tired you can see the exhaustion in her face. She didn't realize surgery would take such a toll on her energy level. The doctor said it would take a year to get her strength back. I made this card today so I could write an encouraging message to her.  I used the Mojo Monday sketch from this week:


I raided a couple of bags of scraps I had at my desk, (thanks to HIMCR) so I'm not sure where all the papers came from although the background seems to be Basic Grey.  The flowers and circle were in my scrap bag left over from a November project. The sentiment is from a Verve set called Brighter Days. The butterfly is from Close To My Heart, colored with Shin Han Twin Touch markers. The colors were too bright at first until I distressed them with gray and brown. The Colonial white circle was distressed with a stippling brush and Flaxen and Glacier inks, but they don't show up in the photo.
I'm sharing this card with the following challenges:
Crafting with Friends #16 - anything goes
Crazy 4 Challenges #327 - circle or pie
Creative Knockouts #132 - die cuts/punches
Let's Color Saturday Linky Party #5 - anything with colored image
Word Art Wednesday #221 - anything uplifting


Monday, February 1, 2016

February Stamp of the Month - Balloon Animals


I'm excited to welcome you to the February Stamp of the month blog hop using the Balloon Animals stamp set.  If you have come here from Helen's Blog, you are on the right path! The blog hop is a great big circle, so you can start here and work your way all around.  If you get lost along the way, you’ll find the complete list of participating consultants on Melinda’s Blog.


I hope you'll enjoy the many Close To My Heart Consultants sharing their creations using this month's SOTM and other great CTMH products on their blogs. This is simple to do - just click on the link at the end of the post on each blog to move to the next one! 

I chose to make the balloon animals on my cards pastel colors, mostly matching the papers from the Penelope paper pack, with the addition of a bit of Pixie and Thistle cardstock from the Whimsy cardstock pack. I made birthday cards with those papers, the  Balloon Animals stamp set,  and the Cricut. If you have the Cricut Explore, and the Artfully Sent and Artistry cartridges, you can use my cut files here to make your own cards. If you don't have either of those cartridges and would like to get them, you can use the links here.  All of the cards are 5.5" x 4.25."


I made these cards for my youngest granddaughter to give when she's invited to a birthday party. My daughter said she's to the parties of boys in her class, but so far only made this first one for a young boy.


I backed the Cricut cut mat with Honey striped paper.  Before adhering, I put pencil dots in the corners of the stars and traced the confetti swirls. Then I covered only swirl lines with the Pear striped washi tape that comes in the Limeade set of tape, avoiding the star markings. I erased the light pencil dots that marked the stars and adhered the Honey strip. The entire mat was pop dotted onto one of the Crystal Blue papers in the Penelope pack using Thin 3-D Foam Tape.  The balloon animals were stamped with Crystal Blue, Honey, and Pear inks and cut out. They were pop dotted with regular 3-D Foam Tape.  I added  a few Blue Dot and Green Triangle Enamel and Glitter Duos.
I'm sharing this card with the following challenges:
Little Red Wagon #326 - birthday
Mod Squad Challenge - masculine birthday
The Male Room #27 - babies and little boys

Here are two cards I made for little girl birthdays:

 I stamped the giraffe using Sorbet ink and added sparkles and a Pixie Extra Thick Twine bow to the stars tag.

I embossed the Thistle panel on this card using the Confetti Stars embossing folder, then I lightly sanded the stars only using a sanding block. This is what I love about the CTMH cardstock with the white core. With only light pressure using medium grain the block keeps me from sanding the recessed surface. The elephant was stamped with Pixie ink and the monkey with Thistle. I decided to add a little bling using black glitter paper, black an gold ribbon, and gold sequins.

Thank you for visiting. Now you're ready to go back to the beginning if you didn't start there. Visit Catherine's blog.


Saturday, January 23, 2016

Card for a Speedy Recovery

Perhaps because I'm an aging baby boomer I seem to know more people all the time who have surgeries, hospital stays, injuries, or physical therapy. Because they're not really ill a get well card doesn't often seem appropriate. So today I made one "for a speedy recovery." That sounds better.

I was inspired by the Tuesday Throwdown Theme of "under the weather," the Color Dare at Color My Heart and the sketch at Atlantic Hearts.


The budding stems and the jar were cut using p. 2 of Cricut Artistry and the Cricut Explore.  I unlocked the images in edit and made the heighth and width different proportionally to fit what I envisioned. I love that editing feature! I was thinking of pussy willows so I colored the buds on the branches white using a chalk marker. I embossed the Peacock mat then lightly rubbed the Peacock ink pad over the raised design. The background paper with the light Crystal Blue stripe is from the new Penelope paper pack. The diamond patterned paper used to make the vase is, too, but the pattern is harder to see in my photo. The stamp used is from the set called Kiss It Better. I love the get well sentiments in that set!

I'm sharing this card with the following challenges:

Color My Heart Color Dare #177 - White Daisy, Whisper, Peacock, Crystal Blue 
PDE Linky Party #107 - anything goes

Tuesday Throwdown #277 - Under the weather
Word Art Wednesday #218 - anything uplifting

6.5" x 5" Card Recipe (All CTMH):
Paper - Penelope, Whisper CS, Peacock CS
Ink - Peacock
Stamp - Kiss It Better B1508
Accessories - White Shimmer Trim, Whisper Thick Twine, Cricut Artistry, Quatrefoil Embossing folder, White Chalk Marker